The GUI is a dockable widget in Maya so you can have Aria has a free floating window or dock it to the main Maya interface to save real estate.
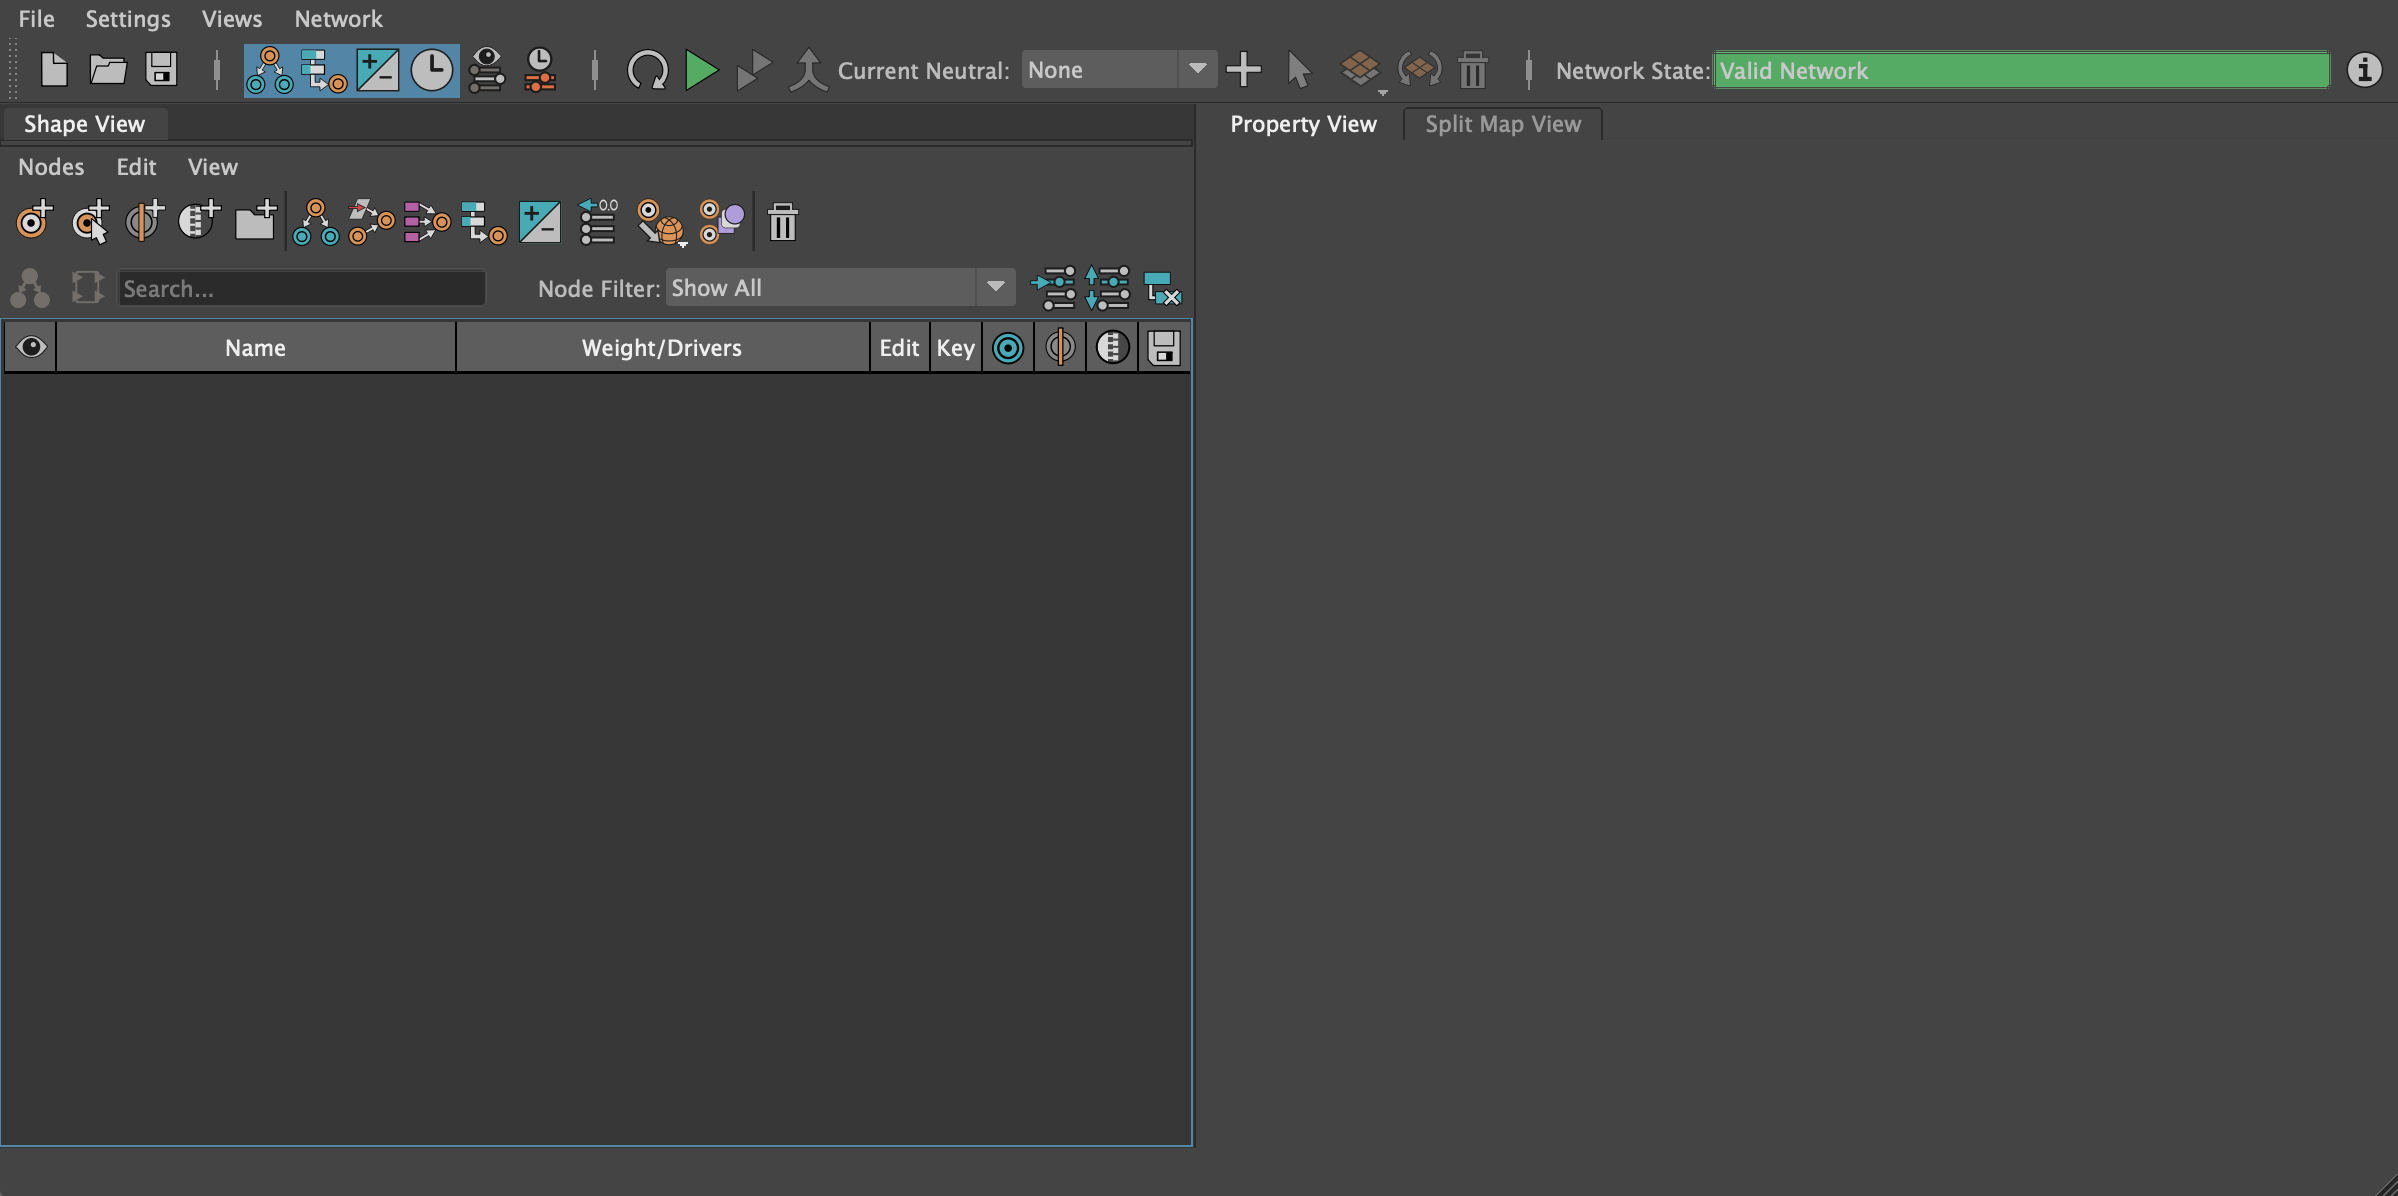
The main interface is broken up vertically into four main sections:
- The menu bar
- The main toolbar
- The views area
- The status and progress bar
The Menu Bar
Operations for the Aria file and non-network specific actions are located in the main menu bar.
The File Menu
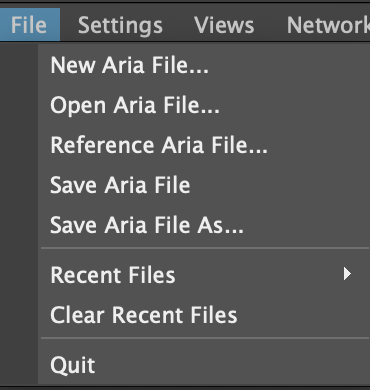
New Aria File: Creates a new Aria file. This will also ask the user to save an existing file if changes exist.
Open Aria File: Opens an existing Aria file. This will also ask the user to save an existing file if changes exist.
Reference Aria File: References an Aria file. This will also ask the user to save an existing file if changes exist.
Save Aria File: Saves over the current Aria file. If a file has network data but hasn't been saved yet a dialog will come up to save the file.
Save Aria File As...: Opens a dialog to allow the user to save the current network data as an Aria file.
Recent Files: A list of recent files to open.
Clear Recent Files: Clears the list of recent files.
Quit: Quits Aria. If a file has network data but hasn't been saved yet a dialog will come up to save the file.
The Settings Menu
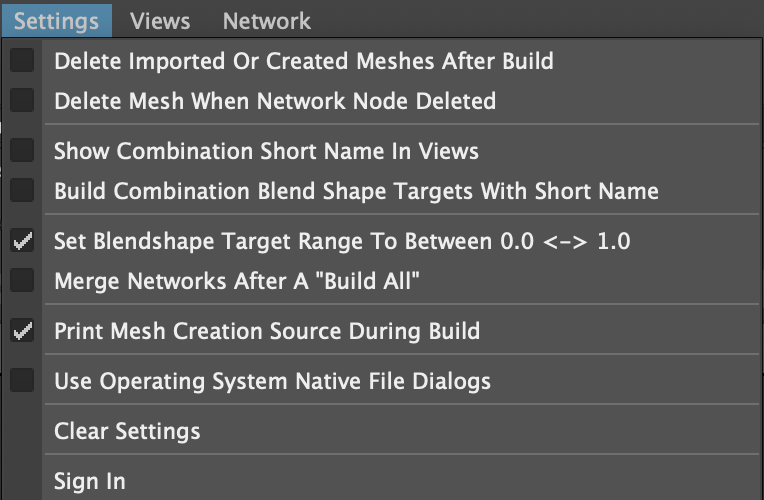
Delete Imported Or Created Meshes After Build: For any meshes the need to be created during a network build if this setting is on Aria will recorded created meshes and delete them post build.
Delete Mesh When Network Node Deleted: If a network node is removed from the shape network and there is a mesh in the scene representing that node the mesh will be deleted.
Show Combination Short Names in Views: In the Shape View the combination name displayed will be the short name. This does not mean the the build will name the blendshape targets as combination short names.
Build Combination Blend Shape Targets With Short Name: Builds the blend shape targets for combinations with their short name even though the Shape View might still show the long name.
Set Blendshape Target Range To Between 0.0 <-> 1.0: Sets the limit of the network node weight range to 0.0 to 1.0. If off any value can be dialed in per network node weight.
Merge Networks After A "Build All": For Aria files that contain multiple shape networks (multiple neutrals) this will merge common node names into a merged network.
Print Mesh Creation Source During Build: Prints where the mesh was created from - the scene because a mesh already exists, the extracted blend shape node or imported from disk.
Use Operating System Native File Dialogs: This manages the "look" of the file browser dialog - either us the one Maya provides or the one native to the operating system.
Clear Settings: Sets all the settings to the unchecked (False) state.
Sing In: For licensed accounts this brings up the login dialog.
The Views Menu
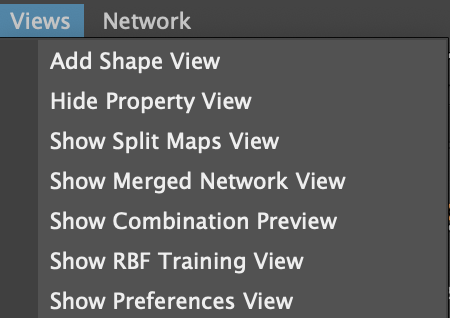
The Views menu lists the various views that are associated with Aria. For hidden views the menu item will display "Show" and for visible views the menu item will contain "Hide".
Shape View: Adds a Shape View to the views area of the UI.
Property View: Shows or Hides the Property View.
Split Maps View: Shows or hides the Split Maps View.
Merged Network View: Shows or hides the Merged Network View.
Combination Preview: Shows or hides the Combination Preview.
RBF Training View: Shows or hides the RBF Training View.
Preferences View: Shows or hides the Preferences View.
The Network Menu
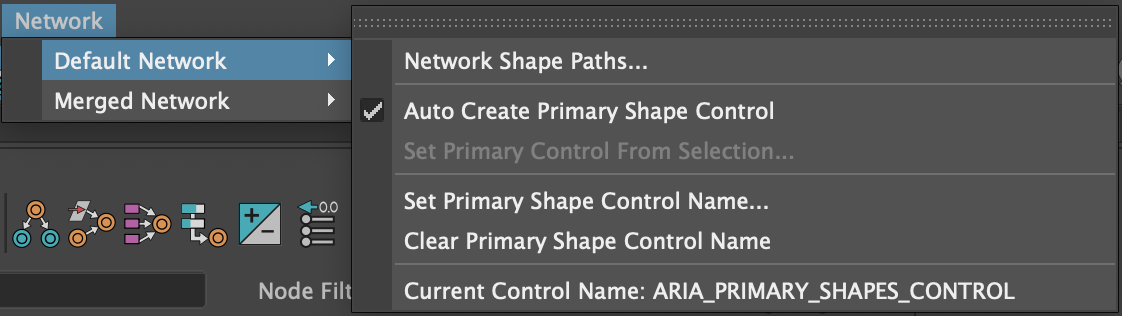
By default, the network menu has two branches or submenus: Default Network and Merged Network.
Default Network Submenu
When no Aria network exists, the name of this submenu is Default Network. Once you have created a shape network, Aria changes the submenu name to that of the shape network (the Neutral Mesh name by default). As you continue to create networks, each new one is added to the Network menu as a submenu with the following item:
Network Shape Paths: Opens the Network Shape Paths dialog to view and change the paths for Symmetrical, Split, Primary, Combination, Incremental and Zip shapes. These are distinct from those found in the preferences file (.ini) file and are typically used for the specific asset a modeler will be working on. The paths are here as a convenience function when import and exporting mesh files to/from Maya. They default to the environment variables setup in the
Preferences View.
Auto Create Primary Shape Control: When on, and you build the shape network, Aria automatically adds a Primary Shape Control node, named [Current Neutral Mesh]_CON by default, to the scene.
Set Primary Control From Selection: Use this option to specify a node in the scene as the Primary Shape Control. Available only when Auto Create Primary Shape Control is set to off.
Clear Primary Shape Control Name: Deletes the set name for the Primary Shape Control node, specified with the preceding control. The naming then reverts to the default.
Current Control Name: Displays the name of the current shape network's Primary Shape Control node.
Merged Network Submenu
The merged network comprises all Aria networks in the Aria file and results from merging these networks. These settings apply to the Primary Shape Control for the merged network; that is, all networks after using the Merge Shape Networks function (

). Aria creates the Merged Network Primary Shape Control when you use the Build All Shape Networks function (

).
Set Merged Network Primary Control From Selection: Use this option to specify a selected node in the scenes the Merged Network Primary Shape Control Node.
Set Merged Network Primary Shape Control Name: Use this setting to change the name of the Merged Primary Shape Control node name. By default, this name is 'ARIA_PRIMARY_SHAPES_CONTROL'.
Clear Merged Network Primary Shape Control Name: Deletes the set name for the Merged Primary Shape Control node, specified by the preceding control. The naming then reverts to the default.
Current Control Name: Displays the name of the merged network's Primary Shape Control node.
The Main ToolBar
The main toolbar is the area that provides file operations, solver states, network building options, neutral mesh management and network state information.

The left side of the toolbar provides buttons for general program operation.
File Operations
The first section is the file operation functions with File New, File Open and File Save.

Build Options
Next on the toolbar is the build options.
Build With Splits
This toggles the building with splits on/off. Aria if flexible enough to preserve split data in the network but still build a symmetrical network. Modelers can create a fully split network file but still work symmetrically by turning this option off before building. Once satisfied with the symmetrical shapes the network can then be built with splits by turning this option back on. In this way Aria provides a very non destructive workflow.
Enable Priority Solver
If network nodes have priorities associated the priority solver is enabled by default in the flexSolver node and as animators work with primary shape weights the solver will redistribute weights based on priorities. To see the original value without the influence of the priority solver toggle this off. You can build a network with the priority solver off or you can leave it on and after the build toggle the solver on/off to check your results. Again, Aria provides a very non-destructive workflow to setting up a complex shape network with additional relationships like priorities.
Enable Averaging Solver
If network nodes have averages associated the average solver is enabled by default in the flexSolver node and as animators work with primary shape weights the solver will redistribute weights based on averages. To see the original value without the influence of the averaging solver toggle this off. You can build a network with the averaging solver off or you can leave it on and after the build toggle the solver on/off to check your results. Again, Aria provides a very non-destructive workflow to setting up a complex shape network with additional relationships like averages.
View Options
The next section on the toolbar is the view options.

Update Views From Playback

When this is on Aria will update the Shape View values (float fields and sliders) during animation playback. This could be a useful tool for debugging shape values and shape triggering. For performance during playback turn this to the off state and the view will not update during playback.
Preview Mode
If a shape network is already built then selecting a network node will set the blend shape node target weights to off except those selected nodes when this is turned to the on state. This is a convenient way of checking shape validity. Just select the shape you want to see and Aria will configure the blend shape node for you. You can select combinations for example and all the upstream network nodes will turn on and display the corrective.
ROM (Range Of Motion)
Creates a ROM animation for you to test out the shape network.
You can generate a ROM just for the selected network nodes or the entire network. You can choose which network to generate the ROM on in the case the Aria file contains multiple networks. You can also choose the animation space (number of frames between shape target keyframes).
Build Options
Next on the toolbar are buttons for refreshing and building the shape network(s).

Refresh The Network
Refreshes the network by running the network validation and comparison with the current neutral's blend shape node if any. This is convenient for testing the state of the network and whether the network can be build or not. Because refreshing the network runs a validity pass it will update the network state and inform the user the result of the validation check.
Build Network
Builds the current network. The color of the build button helps denote the network state. If the build button is green then the network is valid and can be built. If the color is red then there are problems in the network to be resolved. You can check the network status dialog to diagnose where the problem lies.
Build All
When multiple networks exist in the Aria file this is a convenience button to build them all. If the button is green then all networks are valid and can be built. If the button is red then one or more networks have issues that need to be resolved.
Merge Networks
Merging networks allows for the creation of a single Primary Shape Control that aggregates any common primary shape names into a single attribute on the control. For example, if there is a shape network for the head geometry and another for the teeth geometry and both have a jawOpen shape merging those networks would provide a singular primary shape control that has both common primaries across the networks and unique primaries. In this case a singular jawOpen attribute would be added to the primary control and when any value is set on that attribute it would set the same value for the head geometry blend shape's jawOpen target as well as the teeth geometry's blend shape jawOpen target.
Neutral Mesh Section
The next section is the area for working with neutral meshes and networks. Whenever you add a neutral mesh to Aria it creates a new shape network. So for each neutral there is a shape network instance attached.
In order for a network to build properly you mist first specify a neutral mesh. You can build up a network virtually without connecting any shapes to a blendShape node or a flexSolver node. An effective workflow is the have the shape meshes you are working with in the Maya scene, and then set one mesh as the neutral for the network.
Add Neutral Mesh
Select the mesh you want to be a neutral then click the plus sign to create a new shape network based on that neutral mesh. Aria will add the neutral mesh to the list of available networks and set the "Current Neutral" option box to the newly added neutral mesh.
Select Neutral Mesh
Selects the neutral mesh that is the current neutral. Neutral meshes in Aria are stored as the full path so you can have multiple Aria networks with the same neutral mesh name.
Duplicate Neutral Mesh
The duplicate mesh button is actually a menu that gives you the option to duplicate the neutral mesh in its current deformed state or duplicate the rest mesh.
Replace The Neutral Mesh
When making small alterations to the neutral you can select the new neutral mesh and choose to replace it using the "Replace Neutral Mesh" button. When replacing a neutral Aria will propagate the deltas through the entire network for you (including splits and combinations). Also existing meshes that are in scene for network nodes will be altered by the new delta difference between the old neutral and the new neutral. If you are trying to migrate the network to a different character that is spatially and proportionally quite different from the current neutral we suggest using the facePlant plug-in and generating targets on a driven mesh.
Remove The Current Neutral
Removes the current neutral and the network data associated with the neutral. Remember that a neutral mesh represents a shape network in Aria. By removing the neutral you are also removing the entire shape network connected to the neutral.
Network State
The final section of the main toolbar is the network state. This comprises two elements to help understand and diagnose the validity of each shape network. There is a line item that displays messages and colored backgrounds when the network state has changed based on user driven changes. It also shows errors or network validity issues. Then there is the information button to launch the Network Status dialog to help you diagnose exactly where the network is not valid.
Network Status Dialog
Launches the Network Status dialog where you can see network validation information for the current network.
The View Area
The View Area is the middle section of the GUI were you can show and hide various views. By default Aria launches with a Shape View and a Property View.
Showing A View
To show a particular view go under the Views menu and choose to "Show" a view.
Hiding A View
To hide a view you can go to the Views menu and choose to Hide the view that is visible. In addition you can right mouse button over the tab of the view you want to hide and a context menu will show to hide the view.
Arranging Views
Aria allows you to move and arrange the views by dragging the area under the view's name tab to a different location of the view area. For example in the image below we have split the right side of the view area between the Property View and the Split Maps View.
Working With Multiple Shape Views
Aria supports multiple Shape Views - the Shape View is the only view that can have more than one instance in the View Area. There is a selection "link" between Shape Views. Having multiple Shape Views could allow you to show/filter certain nodes in a view compared to another. Below is an image with twoShape Views - one shows all the nodes while the other is set to only show combinations.
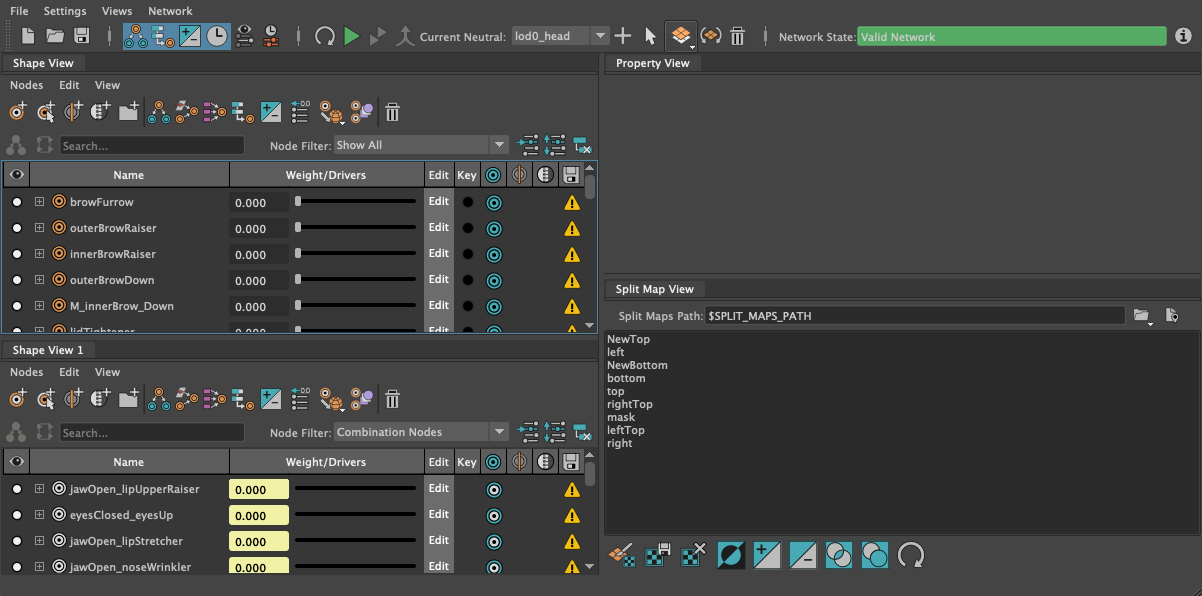
Apart from having multiple Shape Views Aria will remember the view layout when closing the window so that when you relaunch Aria the open views and the arrangement will be recreated for you.
The Status & Progress Bar
On the lower left area of the GUI is the Status Bar. The Status Bar will give you the tool tip for each element in the GUI. So if you rollover an icon in the GUI look to the lower left corner to see the tooltip.
On the lower right side of the GUI is the progress bar. Any action in Aria that takes processing will give you a status message and a progress bar element to help visualize the state of the processing.

Comments
0 commentsPlease sign in to leave a comment.